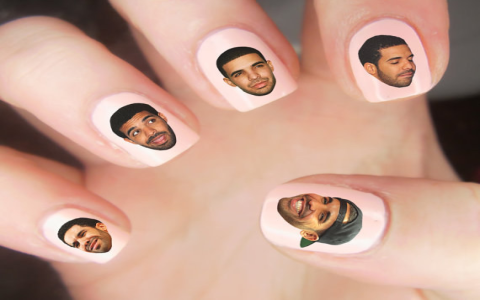
Okay, so I saw these Drake nail decals online and thought, “OMG, these are so me!” I’m a huge Drake fan, and I love doing my nails, so it was a no-brainer. I had to try them out.

Getting Started
First, I gathered my supplies. I already had a bunch of nail polish, top coat, and base coat. Of course, I also ordered the Drake nail decals. It is important to prepare a small bowl of water, and tweezers, that’s enough.

The Prep Work
Next, I prepped my nails. This is the boring but super important part. I removed any old polish, pushed back my cuticles, and buffed my nails a bit to make the surface smooth. A good base coat is key, so I applied a thin layer and let it dry completely.
Applying the Decals
Now for the fun part! I carefully selected which Drake images, I don’t want all fingers are Drake, so I picked some cool designs, and some are lyrics.I wanted to use. Then I cut it from the whole decals paper.I gently soaked the little piece in water,face up, for about 10-20 seconds, then put them out from the water,slide the decal off the backing * can help to put the decals to the correct postion. Finally, I just used my tweezers to place them on my nails. The first couple were tricky, ngl, but I got the hang of it.
Finishing Touches
Once all the decals were on and I was happy with the placement, I sealed everything in with a generous layer of top coat. This helps the decals last longer and gives the nails a nice, glossy finish.I added another top coat after it is dried.
The Result!
And that’s it! I’m obsessed with how they turned out. They’re such a fun way to show off my love for Drake, and they were surprisingly easy to * you’re a Drizzy fan and you like doing your nails, you gotta try these!


